Motif:
It is very important to me to try and capture the atmosphere of a city or landscape rather than just to achieve a documentation of the view. Obviously, the atmosphere at any one location can be very different depending on the time of day and year, which means that I often visit the same site many times before I find the conditions that I am looking for. In the early evening and or very early in the morning the light can be very special. Particularly in the early morning it is possible to see a side of a city or landscape that is very different to the city people know or at least think they know. For example: Semper Dawn, Dresden, shows the sort of atmosphere that it is possible to capture. Reflective Moment, New York, a very early picture shows an unusually quiet and reflective side to one of the busiest cities in the world. In contrast Two Women And Child, New York, actually my first panorama picture, shows a view which would perhaps be more commonly expected. Here the interesting dynamic established by the foreground group helps to bring an alternative perspective to the otherwise ‘normal’ view. This is
  very much enhanced by the very size of the picture which mean that they are often initially overlooked and it is rather the name of the picture which forces people to reassess the view that they otherwise think they know.
In general I try to ensure that the panorama has the right combination of fore- and background. Often a view is ‘breathtaking’ simply because of the feeling of space that it creates; this usually does not translate well to a 2-dimensional photograph with the foreground simply being ‘empty’. Obstacles which the human eye readily ‘overlooks’ in the original scene, such as electricity cables and foreground branches from trees and bushes, are much less easily overlooked in a photograph and I take particular care to avoid these. Blauer Schnee, Kronberg, was actually taken from two vantage points which were over 20 meters apart enabling me to ‘look around’ large  foreground bushes which otherwise would have blocked nearly 25% of the final view on both sides of the panorama. I was able to do this since no part of the view is particularly close to the camera and thus any resulting parallax issues were minimised. A dark line of trees for example which cuts an empty foreground of empty fields from the ‘more interesting’ parts of the potential photograph will be particularly distracting. Water and the play of reflections on the surface of the water often lead to an interesting motif; though the varying directions of the surface waves and ripples depending on the angle of the camera leads to a particularly difficult problem in terms of achieving a final composition. Other compositional issues include decisions about the role of the sky. Is it simply a background to buildings, where I would perhaps aim for less than 33% of the top of the picture, or is it an interesting and integral part of the composition, whereby it might occupy more than 66% of the final photograph? How close is the horizon to the ‘magic ratio’? This single shot of San Diego shows how,
 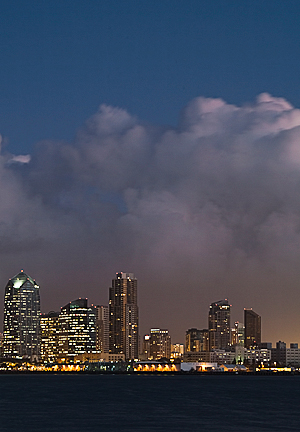 quite rightly, the storm clouds would ultimately have dominated the final composition as they did at the scene. Unfortunately, the clouds were actually moving quite fast and I was not able to use a short enough exposure time to keep them sharp without going beyond the limits of acceptable noise levels vs. ISO-setting for the camera that I was using at the time (Fuji S2 DSLR) and as such the pictures have unfortunately not made it into a final composition.
Capturing the moment:
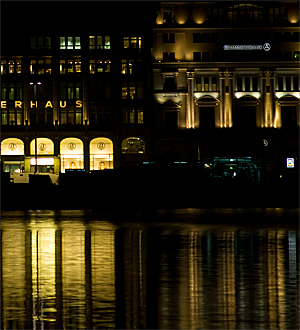
Since all of my panorama compositions are made from combination of multiple digital photographs it is important that the depth of focus across the picture remains the same. Two pictures with different degrees of sharpness cannot be combined. For this reason the pictures are either taken in full manual mode or more usually with aperture priority with manual focus so that the camera does not reset the focal point during a sweep of the panoramic motif. I take many rows of pictures, usually in portrait mode, since this ensures the maximum vertical pixel resolution of the final photograph (and hence total available pixel resolution) with at least 30% horizontal overlap. The exposure time is adjusted for each individual shot so that the maximum amount of detail will be captured. This means that depending on the ambient light and the direction and orientation of strong light sources (including the sun) neighbouring photographs often contain very different contrast and colour palettes. If however, the exposure times were also kept constant the colours and contrasts would be much closer (though not necessarily identical) but any regions of neighbouring photographs which as a result were under or overexposed would result in a loss of data that I would not be able to recover. Since on the whole I am looking to capture as much detail as possible in both fore- and background I tend to use a focal length of between f8 and f13. This represents for many lenses a setting which will produce the optimal native optical sharpness of the lens. The use of a very strong and secure tripod is for the most part unavoidable though ‘Rooftops over Paris’ was handheld with  the lens being put through the wire fence surrounding the top of the tower on Notre Dame. For a 160-180° panorama it goes without saying that it is very important that the tripod is level since an even slightly incorrectly adjusted tripod leads to incremental changes in vertical position which ultimately may result in a much narrower final composition than that which I had intended. The secure tripod is also necessary if, as was the case for the Hamburg night pictures, each picture is repeatedly taken with different exposure times so that detail in both the very darkest regions and very strongly illuminated regions could be captured. The final result following manual combination of these pictures was a panorama
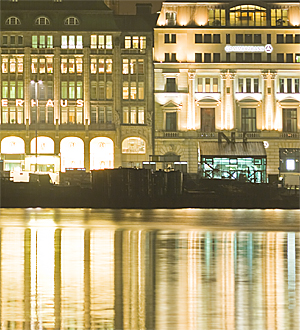
 comprising of stacked ‘HDR’ shots. Keeping the camera as vertical as possible results in minimal vertical distortion – though depending on location and view this might not be physically feasible without recourse to a tilt/shift lens. If it is clear that the camera is titled strongly away from the vertical plane then I would overlap each shot by much more than 30% so as to allow more room to remove vertical distortion when preparing the final composition. The final point to remember is that, ideally, the axis of rotation should pass through the ‘nodal point’ of the camera lens combination – as a rough estimate this will lie approximately half way between the plane of the sensor (often marked on the camera with a line through a circle) and the plane of the final glass element of the lens. In most cases this will be a best ‘guess’. It is however easy to check by looking through the view finder at a close and distant object and rotating the camera left and right – if the relative position of the two objects don’t move then the camera is rotating around the nodal point.
Computer work:
This is without doubt for all of my final compositions the largest part of the work, primarily, because every final composition is constructed, manually, from many individual photographs. Initially, all of the series of photographs will be inspected to see if I can recognise a series (not necessarily from consecutive photographs) which captures the motif in the way that I was hoping. These are then inspected very closely to ensure that they do not contain a fundamental flaw, i.e. unexpected camera or object movement leading to blurring etc. Only then will I begin the work to convert these into a final composition. In the first instance each RAW image (16-Bit, Colour-space: Pro-Photo) will be processed with it’s ‘as shot’ settings and these first images put into a single montage and at a crude level the overall contrast and colour settings adjusted together with individual changes of the colour settings to check that a compromise across all the pictures is possible. This allows me to identify what problems exist within the series. Do I have dark banding caused by vignetting? Is there a colour change across individual photographs which would ‘force’ too large a colour change across the whole picture? Having made these adjustments, I re-edit the RAW data using of all of the changes identified so far, including ensuring the same levels of noise reduction and ‘pre-sharpening’ are applied to each image. The resulting RAW output files are recombined and an initial attempt made to remove false perspective and to look for a good physical match between adjacent pictures – the size adjustments required for each picture are noted separately. Note at the corners of 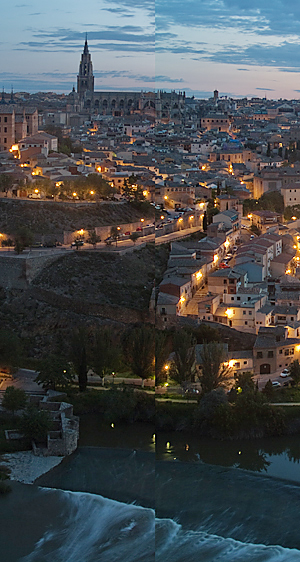 the picture, depending on the vertical deviation of the view from the plane of view of the camera (for example with the foreground valley in the Toledo pictures), this match may be very bad!
  However, this allows me to identify fine colour adjustments required for each picture. Remembering that it is not sufficient to match the colours exactly just at the point of intersection since this hard edge is later removed and thus any mismatch of the colours remote to this edge will become very obvious. Again these fine changes are re-edited into the original RAW data and a new series of photographs produced and placed in a montage – the removal of false perspective and other distortions that were originally identified are applied to these new individual pictures. Clearly if under and overexposed pictures are used to bring out shadow and highlight detail then this process is repeated several times prior to and post ‘vertical blending’ of these different exposures. Each time the required changes are noted and re-edited into the original RAW data and the process repeated. Thus at this point, at most only two permanent changes have been made to each RAW colour/contrast optimised individual picture: a) combination with under / overexposed versions of same picture and b) 1 x spatial distortion to allow vertical alignment of buildings etc. (removal of false perspectives etc.). Now the work begins, assuming that the colour matches are correct, to physically remove the hard edge and to blend each individual picture into each other. Here particularly problematic are changes in perspective along wave fronts on the surface of water or perspective changes exaggerated by strong vertically displaced objects (Foreground in Rooftops over Paris or Toledo). Here a considerable amount of ‘painting’ onto new layers with both photographs is unavoidable. When a full colour and physically matching set of individual photographs have been achieved I start any global ‘cleaning’ operations that are required. Again new layers receive fine retouching to remove dust, hot-pixels, star / plane streaks (night exposures) as well as perhaps more significant operations to remove building cranes or scaffolding or other non-permanent constructions which otherwise strongly detract from the motif. Only at the point, when all of these operations are complete and no problem can be found over the whole picture, even at the pixel level, will the third permanent change to the data be made as these photographs and retouching layers and masks are all physically merged into one picture. Very important to me is that, despite all of this work, the final result should look as if no work has been done to complete the picture, which should thus look as if it is a single photograph!
The final combined data will be assigned an output colour profile specific, for example for the matt silver photographic paper that I routinely use for my pictures. A separate ‘sharpening’ layer will be generated specifically and retained separately for each assigned output resolution. The reason that so few permanent changes are made to the data during the whole process is that each ‘optimisation’ change for the colour or contrast etc. actually removes data, so that the multiple sequential changes that would otherwise be required in the case of a large panoramic picture would, eventually, lead to a significant degradation in data quality by the time all the repeated fine adjustments have been made.
Producing the Photograph:
The final picture and specifically generated sharpening layer are converted into a final single layer TIFF data which is used by a Lamda laser photographic reproduction instrument to illuminate the matt silver Kodak photographic paper. This is then developed as per a normal colour photograph. The final photographs are mounted onto acrylic with polished edges and a protective backing and mounting frame on the rear as part of a signed limited edition.