IN SOME BROWSERS THE PRODIBI IMAGE VIEWER DOES NOT LOAD AUTOMATICALLY – CLICK HERE TO LOAD IMAGES

Introduction
With the arrival of the SIGMA sd Quattro and SIGMA sd Quattro H (LINK) cameras, SIGMA introduced the SFD-Mode to acquire an image. This has subsequently been made available on the dp Quattro cameras via a software update. SFD-Mode or “Super Fine Detail” Mode is without doubt the pinnacle of image quality that can be achieved with a Foveon type sensor. This short article takes a look ‘under the hood’ and gives a feel for what can be achieved with this somewhat under appreciated camera mode.
Since this article is about image quality, all of the full images in this article can be viewed at 100% via PRODIBI (LINK). Simply clicking on an image will open the Prodibi Viewer, which will allow the image to be zoomed to 100% in any part of the image. The images in the viewer have also been encoded for maximum quality so that, depending on some browsers, there may be a slight delay in the loading of an image. To return to the article from the viewer use the arrow on the top left.
Copyright: As with all images on this website, none of the images in this article may be copied or reproduced in any form whatsoever.
The SFD-Mode works by combining seven images which are taken automatically with exposures ranging from -3 EV to +3 EV (in 1 EV steps), either side of an initially defined exposure setting, which are subsequently saved as a single X3I file (rather than the normal single image X3F file). The resulting combined image, following conversion in SIGMA’s proprietary RAW Converter, SIGMA PhotoPro (SPP), has, as one may expect from the name, the maximum amount of detail which the Quattro Foveon sensor can extract from an image, with, and this is very important, incredibly low levels of image noise. The conversion also results in a different dynamic range than that, which is normally accessible through a single X3F RAW file. Whilst at times this may be very useful, for example when taking images directly into the setting sun, this is not however the main benefit of the SFD-Mode and resulting X3I RAW file.
Why are the noise levels so low … ?
There are two principles that explain why the images obtained in SFD-Mode are so noise free. However, I have to state that I do not have any direct information about the algorithms that lie behind the conversion of an X3I RAW File and thus cannot say to what extent each of the principles actually apply to the conversion of any one image. Without a doubt the actual processing involved is considerably more complex than the simplified explanations I have given here. First, a word about electronic (read: digital image) noise. As I explained as part of my article here: THE SIGMA FOVEON SENSOR A PERSPECTIVE (LINK), luminosity noise in an image is not necessarily a problem and certainly much less so when reproducing an image in physical form than many a forum debate would suggest. Nevertheless the absence of noise in an image, when not achieved through noise reduction algorithms, which for the most part result in some detail loss, however small, allows the minutest of details to be extracted from an image. This results in a level of ‘realism’ and ‘plasticity’ that is otherwise hard to achieve.
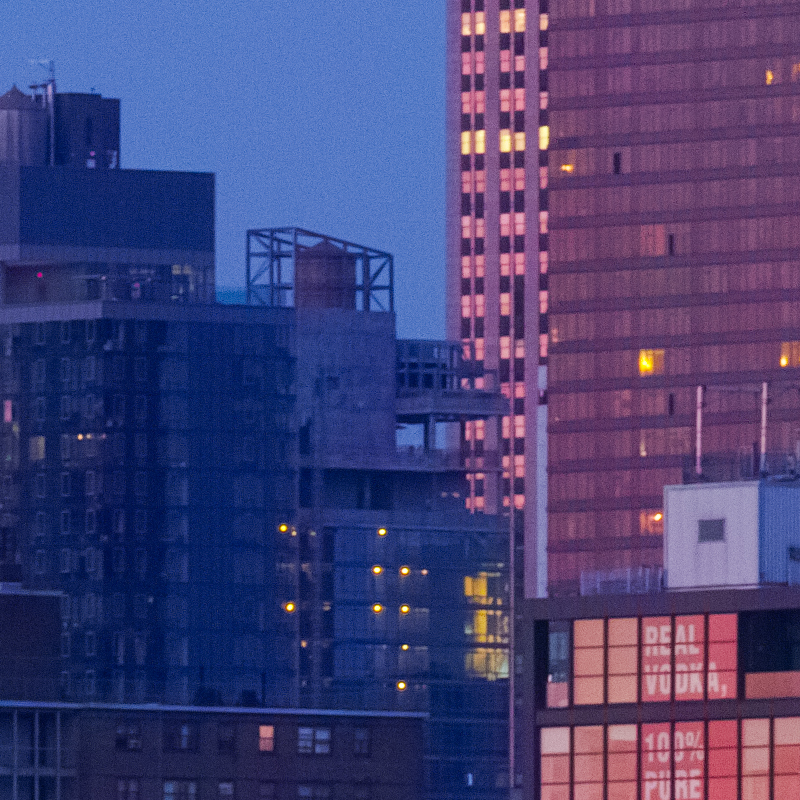
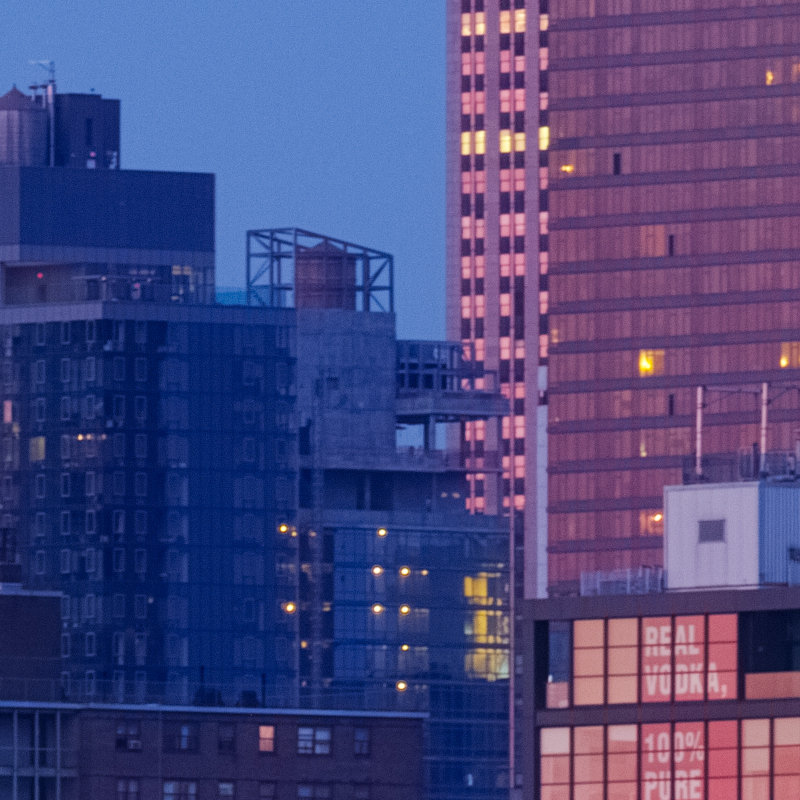
The first principle that helps to explain the absence of noise without loss of detail is that digital noise in an image is random. Simply taking two images after each other with the same exposure settings will result in two images with the same level of digital noise (= deviation of the lightness or darkness of a single pixel (luminosity noise) or deviation of the actual colour data for a single pixel (chromatic noise), but at the pixel level the deviations will be different. Overlaying these two images (50% transparency for the top image), assuming correct pixel alignment, will give an average of this deviation and thus produce a result which is closer to the ‘true’ value. As with all image combinations, all consecutive images have to be taken, of course, from a tripod with a stationary subject. Repeating this with a third image (now 33% transparency for the top image) will give an average which is even closer to the true value. This I can show with the following extracts from a New York image:
A single image (left) vs. a combination of 4 consecutive identically processed images with 100%, 50%, 33% and 25% transparency (no noise reduction applied):
The second principle relates to the light collection by a pixel on a digital sensor. A pixel collects light, rather like a bucket collects water, until it is full. Just as when you try and add more water than the bucket can hold, more light than the pixel can hold is simply not collected and it is ‘burnt out’ (= 100% white). It cannot show any information related to the extra light it receives. If the pixel receives little or no light (i.e. there is little or no water in the bucket), then the pixel is very dark or black. However some of the light that the pixel says it has received (i.e. some of the water in the bucket) is not real, it is the noise from the electronic circuitry itself (which all electronic circuits produce). It should be clear that the less ‘real signal’ the pixel receives, (the less genuine water in the bucket), the more difficult it is to differentiate ‘real’ signal from noise and the more likely it is that the real signal may be ‘swamped’ by the noise. This is (one of the reasons) why differentiating real data from noise in the shadows of an image is always more difficult. It stands to reason that when the pixel receives just a little bit less than the maximum amount of light it can collect (the bucket is almost, but not quite, full), then the sensor will produce the best possible signal to noise ratio and the image will be as noise ‘free’ as possible. By taking seven different images in SFD-Mode with seven different exposure settings (-3 EV to +3 EV), seven different parts of the image are given the chance to ‘nearly fill the bucket’ and produce the best possible signal to noise ratio. Combining these different parts in the final image will result in an image with the best possible signal to noise ratio over a much wider luminosity range than would otherwise have been the case.
Shooting for SFD-Mode
Obtaining and working with X3I files requires a slightly different approach to the motif at hand. It should be clear that in order to combine 7 consecutive images they need to be shot from a tripod and the motif itself should, ideally, not move. That said, it is quite possible to obtain interesting and very usable images with moving water for example. Where there is no wind movement even outdoor macro motifs are quite possible. Even if, after the event, it turns out that there was too much movement for the full combined X3I conversion, each of the seven X3F files can be individually extracted from the X3I RAW file quite readily (through a simple copy-paste type process). Selecting SFD-Mode in the camera menu automatically sets the camera to ISO 100 – for myself not a problem since neither Ines or myself rarely use the SIGMA sd Quattro H at ISO values higher than 200. Fundamental to the quality and usability of the X3I RAW file is the actual exposure setting for the camera. Ideally, both of the shots which are +3 EV and -3 EV stops above and below this exposure setting, should contain detail information and thus the initial exposure should be set to achieve this. ETTR (Exposure To The Right), a good technique when using a digital camera, where the exposure is set to slightly ‘over exposure’ the image, is not necessarily something I would recommend for a motif shot in SFD-Mode. In this case there is a real danger that the image that is +3 EV stops higher than this setting will be completely blown, and will thus contain little, if any, usable information.
Processing X3I RAW Files
Of course the resulting X3I files are very large and thus take longer to save in camera. Similarly, working with and processing an X3I file can take considerably longer than working with a single X3F RAW file – patience will be a virtue and having as much processing power as possible will make a real difference. In the video section of this website there are a set of training videos for working with SIGMA’s proprietary RAW conversion programme – SIGMA PhotoPro (SPP): VIDEOS (LINK). One of the training videos deals specifically with processing X3I files. It is important to remember that whilst the image is being processed in the RAW converter, all seven images remain active and are “re-combined” whenever the settings are changed. In general, the settings themselves are very different to those which one would expect to find for an ‘equivalent’ X3F file and the sliders have a different effect than one might expect. Moving the Contrast control slider, for example, will also significantly lighten and darken the image. As a note, due to the ‘absence’ of noise, the Detail control slider can be moved much closer to the right than perhaps would be suitable for a X3F file, and certainly should not be left on its default ‘soft’ (to the left) setting. In the first instance, leaving the conversion on the auto setting and then adjusting the control sliders from their resulting positions should give a good feel as to how the control sliders interact with each other. Since a converted X3I RAW file is, per se, ‘noise free’ the noise reduction sliders should also be set to the left (= no noise reduction). With images that have a high level of contrast and many highlights, I aim more to get to a good TIFF extraction, where the highlights and shadows are nicely preserved, rather than to push the image too much in the direction of where it might eventually end up. Such a well rounded TIFF file provides me with a much better starting point for further work (in Adobe Camera Raw for example). The images on show here were processed in SPP with Detail settings of between 5-7 (7 being full right). They have received no noise reduction and an Unsharp Mask (Amount 60-70; Radius 0.5-0.6; Threshold 0) was applied in Photoshop. Certainly for the wet lava images this results in a suitably “crunchy” look.
Conclusion
Ultimately it is the image quality which speaks for itself and I hope the few examples I have provided here have shown what a SIGMA sd Quattro H camera in SFD-Mode can achieve. I routinely display images at 100x150cm in international galleries and exhibitions (See Portrait – LINK) and, whilst there are many aspects that combine to produce the results I am looking to achieve, there is no doubt that image quality is a key aspect of the final picture. For both myself and INES (LINK), the SFD-Mode has brought a new dimension to the Foveon Sensor: It is well worth investing the time and effort in order to get the most from the resulting X3I RAW files.
Images in this article were taken with:
SIGMA sd Quattro H (LINK)
SIGMA 50mm F1.4 DG HSM ART (LINK)
SIGMA 180mm F2.8 EX DG OS HSM APO MACRO (LINK)